I decided to go with preshading plus random mottling over various panels. The refueling door was painted and masked off at this time.

The bottom gets more panel mottling as it gets dirtier here.

The stores were painted with my usual masking and spraying for the missile bands.

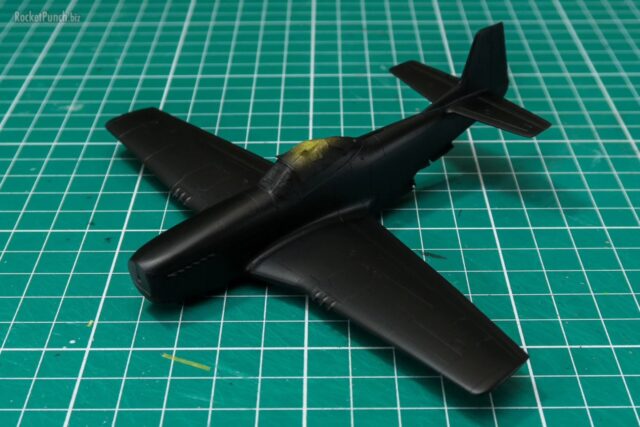
RSAF F-16s are still painted in the old scheme of three shades of gray: FS36375, FS36270 and FS36118. I used Mr Hobby Aqueous for all of them. Instructions called for FS36320 for the nose but I went with my usual FS36251. There was quite a bit of masking required for this build compared to the usual USAF F-16s: the leading edge of the wings are a lighter gray while the leading edge of the tailfin is a darker shade of gray.

Next I tackled all the little details. First that box in the gearbay which I painted blue due to the lack of a reference photo. I believe it can be blue or red.

Looking at photos, There should be an additional silver line between the nozzle and the housing. I did this by masking and spraying.

The wingtip lights and RWR (AKA ‘beercans’) were picked out with handpainting. To help with attaching the AIM-120 I added a small piece of styrene rod to act as tabs on the wingtip launchers.

The intake lights were handpainted and attached but they fit with some gaps which necessitated some putty work. There’s also no corresponding slot for the pitot to fit into so I made the decision to simply butt join it to the nose.

The nose and AOA probes were picked out with handpaint.

I referenced a lot from my friend Mark Chen’s build over on ARC. Based on his build I added the antenna forward of the refueling door which is oddly missing: it’s a common F-16 feature and even the much older Hasegawa kit has it. This was done with styrene and then handpainted. The antenna on the tailfin was also picked out with handpainting.

All done and decaling is next.

The kit includes markings for the two squadrons that fly the F-16C out of Tengah Air Base: 140 ‘Osprey’ and 143 ‘Phoenix’ Squadrons. I decided to go with the 140 markings due to its logo having the Singapore island on it.

The kit decals was designed by Milliverse and I noted that the checkerboard chevron is orange and black instead of red and black. I could have changed to the 143 F-16 but I wanted to stick with 140 Squadron so I checked the much older Zotz Decals VIvacious Vipers #2 sheet. It does have markings for 140 Squadron and the chevron was in the right colors. So the markings will be a mix of two sheets.

The decals went on without a problem over a gloss coat and reacted well with Mark Softer. Note the lack of the usual walkway lines on the fuselage and wings.

Tha RSAF maintains a very clean bottom for their F-16s with no national or unit markings. Frog includes decals for the area in front of the intake but they are noted as optional. I decided to leave them off.

The Zotz chevrons are too short (perhaps because they were originally designed for the Hasegawa kit?). The ‘missing’ area was handpainted on.

I then gave the kit a satin coat and the usual panel wash with Abteilung Starship Filth after.

The bottom really pops after the wash. Once cured, I misted semi-gloss over the kit to knock the glossiness down a tad.

Then it was time to check my work on the canopy: it turned out well.

I then attached the nose wheel, nose gear door and main wheels.

Then the stores went on.

And I’m done. This build hasn’t been the easiest but at least the end result looks good. With the Academy offering done I’ve now built an F-16 from four manufacturers. Maybe it’s time for a comparison article similar to the one I did for the F-4 Phantom.
Build Log
Pt.1 – Construction | Pt.2 – Construction | Pt. 3 – Painting & Finishing