Kit Info
Brand: Hasegawa 65764
Scale: 1/72
Media: Styrene, Resin
Markings: From VF-1D 65780
The Subject
First introduced in 2008, the VF-1 was developed for the UN Spacy using Overtechnology obtained from the Macross alien spaceship. It would remain as the mainstay fighter throughout what would be called Space War 1. The VF-1 is capable of space flight and is able to have FAST packs attached to it to increase performance and ordinance.
The VF-1 is designed to be able to transform into a bipedal humanoid ‘Battroid’ mode and a hybrid ‘Gerwalk’ mode where the VF-1 takes on the look of a fighter jet with a pair of arms and legs. In Gerwalk mode, the VF-1 has the additional capability of VTOL operations and is able to skim the surface like a hovercraft. In Battroid mode, the VF-1 is capable of replicating human movements and most importantly, go into hand-to-hand combat with enemies.
The VF-1D is the two-seat verariant. It features two TV camera systems and twin laser cannons in its head. While initially developed for training, the UN Spacy would also deploy the VF-1D in combat roles. The VR-1D is a further variant of the VF-1D that was developed for Tactical Reconnaisance.
For this mission the VR-1D carries special tactical reconnaisance pods in place of the GAU-11 gunpod. The reconnaisance pod contains many sensors that enable the rear seater to monitor combat situations in detail. The VR-1D is also equipped with an IRST (Infrared Search and Tracking) sensor forward of the canopy for additional tracking capability.
Info based on the anime series The Super Dimensional Fortress Macross, not Robotech
Info from Wikipedia, the Variable Fighter Master File ‘SDF-1 Macross VF-1 Squadrons’ and Macross Wiki
The Kit
The base VF-1 kit was first released in 2000. In 2002, the original VF-1D variant was issued as a limited release with a fret of photoetch detail parts. In the same year, another limited VF-1D was released in the colors and markings of the VF-1D Maximilliam Jenius piloted during his wedding with Millia Jenius. This kit does not include the photoetch fret and is (except for the clear parts) totally molded in blue styrene. ‘Virgin Road’ refers to the title of episode 25 of the Macross TV series where Max and Millia wed.
Revolutionary at the time of release, the parts were designed to be able to be built in sub-assemblies so you can paint them separately before finally assembling it together. Now that it’s 2020 though, it is showing its age with most of the components broken down to the very basic left and right halves so there are seamlines everywhere.
There is only one marking option and no pilots or missiles are included (you need the weapons set for these). There’s also no gear up option out of the box. This is the original 2002 release so the molding is still very crisp with no flash anywhere. The decals however have yellowed and require replacing.
The Build
My friend gave me this kit when he was trimming his stash. His loss, my gain. 😄
I was flipping through the Variable Fighter Master File ‘SDF-1 Macross VF-1 Squadrons’ artbook when I saw a picture of the VR-1D which was a VF-1D with a nose IRST sensor and with a recce pod mounted in place of the GAU-11 gunpod. I thought it looked interesting and I filed it away to something I should consider building if I can find an underbelly recce pod. Lo and behold, while perusing Hobbyeasy, I spotted a resin CMK 1/72 EADS GAF Telelens which looked quite similar to the one in the artbook. It took a few weeks for the pod to get here but I was happy to see that the size was just right. While I wasn’t sure the pod would clear the landing gear, I was going to build the VR-1D in-flight so that wasn’t an issue. I kept some of the parts left from the F-14 Kai build ( link) and rummaging through them, I saw that the chinpods could be modified to look like an IRST. The modified part required some blending work to conform to the nose but once done, I thought it looked the part.
The artbooks also used real-life modern weapons to load up their rendered Valkyries. I thought the Storm Shadow cruise missile looked particularly nice hanging off a VF-1 so I bought a box of Hasegawa 1/72 Modern European Weapons and took the two missiles from there. The ‘Itano Circus’ AMM-1 missiles and pilots came from the Hasegawa 1/72 VF-1 Weapons Set.
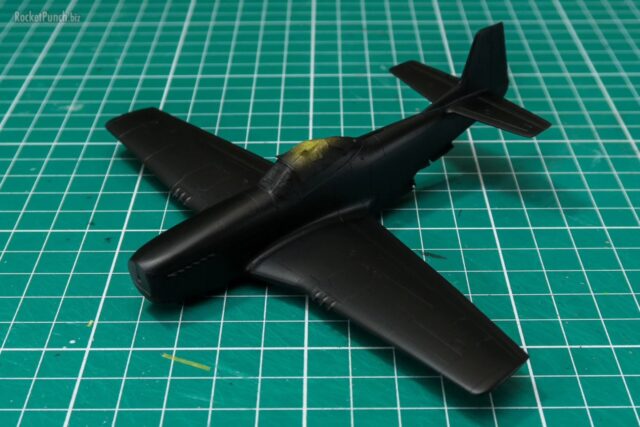
The build was even more straightforward than my previous VF-1S build since I didn’t have to contend with the FAST packs. I did find however that the nose section required some trimming to fit properly into the fuselage section. I also added a shim at the bottom where the nose met the fuselage to get a better fit. I also covered the usual spots where you can see empty spaces like the area in between the wings and the aft vent in the tail. This is my third VF-1 build so there’s no real surprise by now.
 Colors & Markings
I based the color scheme on a two-tone gray VF-1A I saw in the same artbook. I originally used FS36375 for the lighter gray but after seeing that it looked very similar to an F-16’s scheme, I ended up replacing the light gray with a custom mix of Mecha Color White Grey and Model Air Aggressor Grey instead. The darker gray was straight Model Air Aggressor Grety. A side effect of this switching of colors is a slight tonal difference in the main fuselage (where I did paint the FS36375) and the other parts (where I didn’t). This was something I’d have to address in the weathering stage. To add some contrast, I painted the wing and tailfin tips orange. I also painted the head unit in orange to add some color to the bottom.
Painting the kit was actually straightforward, I just had to do a lot of masking. I got lazy though and ended up having to fix some overspray and bleeding of the paints. Painting thus took longer than usual. The results however, was satisfactory.
The markings that came with the box was the same as Max’s blue VF-1J with additional ‘Just Married’ markings for the nose. The whole decal sheet however, had yellowed so I took the sheet from a VF-1D kit in my stash instead. These went on very easily and as usual worked wonders with Mark Softer. I used Mark Setter to aid the wingtip light decals to bend over the wingtips.
Finishing
First, the panel wash was done with a mix of raw umber (darkened slightly with black) oil paint. I’ve switched back to regular oil paints from the pre-mixed panel washes as they are odorless. Before further weathering though I had to put the kit together.
As per usual I did the kit in subassemblies. While convenient, it did result in some tonal differences in the paintwork especially since I used a custom mix of paint for the main color. I had some difficulties attaching the components to the fuselage and ended up using CA glue to get them to stay in place. I think I’ll try to assemble as much as possible before committing paint for my next VF-1 build. Let’s see if that’s easier.
The blending and fading was done with white and blue oil paints. I originally used a yellow oil paint but it added a warm tone to the finish which I didn’t want. I cleaned it up and used blue instead which retained the cooler tone. The two oil paints serve to tie the different contrasting colors together and allows the markings to look like they aren’t ‘on top’ of the main camo colors so to speak. As a finisher, I used Starship Filth to add random patches and streaks. I also dirtied up the areas on the wings that would swing into the fuselage. I did all these over a satin coat. I find the satin coat is just flat enough to have some grip on the oil paint.
After the oil paint has been given time to cure, I then attached the stores under the wings and recce pod. Last on were the various tiny clear parts where some required careful painting with clear paint.
And I’m done. While not perfect (as usual) I like the results and I think the Storm Shadows in particular look good hanging off the wings.
Build Log
> Part 1: Construction
> Part 2: Construction
> Part 3: Painting
> Part 4: Finishing
Number 4 of 2020