The interior of the cockpit was simply sprayed Black Grey and then given a light drybrush of Light Grey. Bandai includes decals that covers most of the interior but I decided against using them.
After masking the inside of the canopy, painting begins with a black base of A&K Black Primer.
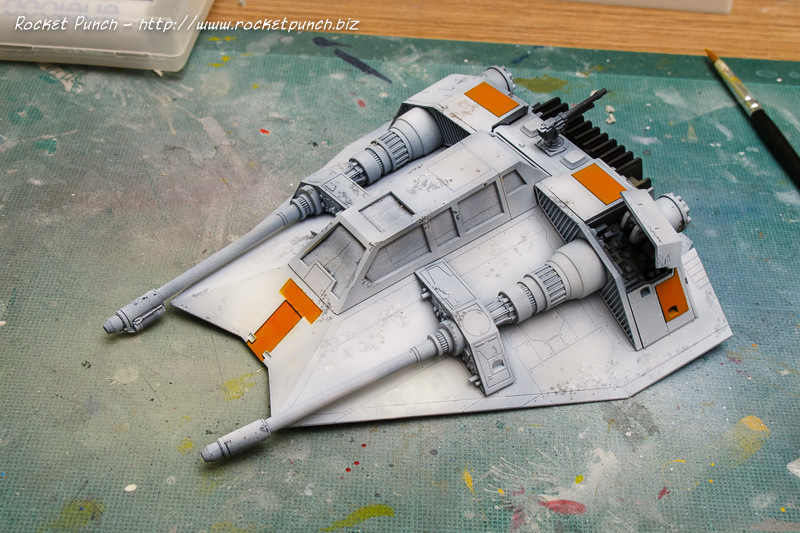
I was concurrently painting an A-4E and I had some leftover paint from that build’s camouflage so I decided to just randomly add patches onto this build to hopefully get some color variation when the top color comes on. Hopefully it’ll work.
A very patchy look indeed with 2 tones of brown over black.
I then tried my hand at some salt chipping. It was a simple matter of brushing some water onto the surface and then pouring salt on the water. Once the water evaporates the salt will be stuck to the surface. I then sprayed Dead White over the whole kit which turned greyish due to the bottom colors. Once the white was dry I rubbed the salt off with my fingers and a toothpick. What’s left behind is the bottom color in a random chipped pattern. Nice!
Incidentally, some of the brown shows through so mission accomplished!
I then toned down the chipping by spraying a light coat of Dead White all over. Next, I masked off and sprayed the orange panels with Fire Orange. Luke Skywalker’s snowspeeder is supposed to have dark grey panels but I think the kit needs some color for contrast.
I also made some usual mistakes and ended up with some orange overspray which I sprayed over with white again. These sections now have a slightly warmer tone which I think looks quite nice.
I then did more chipping using a sponge dipped in Black Grey. It’s quicker than using salt but the chips from the salt are a lot finer. The effect of sponge can make the chips look more splotchy with finer edges.
Next I used a 0 brush and carefully stippled Black Grey and Light Grey onto the kit. When I need to tone down the chips I stippled more Dead White. I also made sure the orange panels received some chipping.
It turns out that it’s not easy to purposely be random about the chipping. 😀 It’s also very easy to overdo it which I think I did in this case. But I shall take it as a lesson and move on to the next stage. After another day to cure, I glosscoated with Lifecolor Gloss on top and tested Vallejo Gloss Varnish on the bottom.Then I added small number of decals, the most prominent which is the mirrored ‘ZZ’ on the canopy. Then I handbrushed Future over the decals to seal them in.
After yet another day of curing, it was time for panel washing. For this build, I decided to go back to using the oil paint + turpentine combo. In this case it was Blue Black color. I have to say the oil paint wash is a lot easier to use than the Vallejo Model Washes. They flow better and require less passes to come out opaque.
The grill at the back of the Snowspeeder and the harpoon gun were then given some ‘drybrushing’ with a Silver Grey color pencil.
While the snowspeeder is left to dry, I quickly prepped the base by spraying the sides Black Grey. Then to add some texture, I randomly sprayed Black Grey on the dips of the sculpted surface.
Then an overall spray of Dead White was done.
After yet yet another day of drying, I flatcoated the whole kit and base with 2 passes of Vallejo Matt Varnish. The canopy glass was previously handbrushed with Future to give it a shine but with the rest of the kit being so weathered, it now looks out of place. So I ended up very lightly dusting it with AMMO Light Grey. To replicate the look of the glass having seen some cleaning, I literally swiped it with a Windex soaked cotton bud. It was also at this time that I realized I painted the vent upfront orange when it should be a dark grey so I handpainted it with Dark Seagreen, washed it with Model Wash Grey and a added light highlighting with the Silver Grey color pencil.
And I’m done!


