


Kit Info
Brand: Hasegawa
Scale: 1/48
Media: Injection Plastic
The Subject
The Douglas (later McDonnell Douglas) A-4 Skyhawk is a single seat subsonic carrier-capable attack aircraft originally developed for the US Navy and US Marine Corps. While relatively lightweight, it was nimble, had a top speed of more than 670mph and could carry the same bomb loads as the B-17 Flying Fortress. Deliveries to the USN and USMC commenced in late 1956 and withdrawn from front-line service in 1976 and 1994. The A-4 would however remain in USN service in training units (like TOPGUN) flying as stand-ins for the MiG-17 in Dissimilar Air Combat Training. It will serve in this role in TOPGUN until 1999.
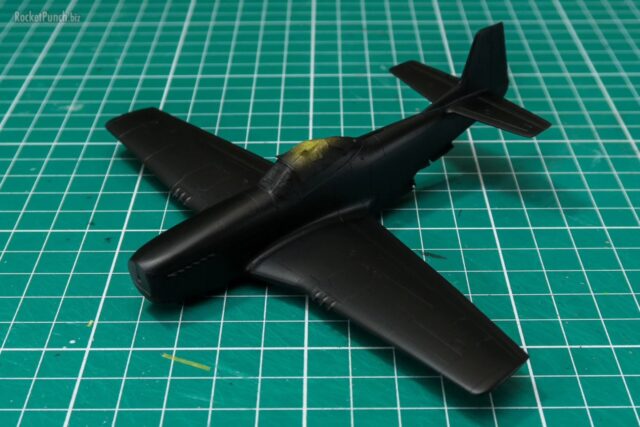
This build depicts an A-4E serving with TOPGUN in the early 1980s. During this period, the squadrons were constantly trying different camouflages. TOPGUN 56 had the silhouette of a camouflaged MiG-17 painted onto it but was only dressed up this way for a short period of time.
Info adapted from Wikipedia
TOPGUN 56 info from Modeling Madness and Hyperscale
The Kit
This is pretty much the definitive 1/48 A-4 kit in the market right now. Hasegawa has boxed every major variant of the Skyhawk except for the OA-4M, with each box usually including parts to do up various versions of the A-4 if you know what to look for.
The kit comes in 7 light grey and 1 clear sprues. Panel lines are nicely done and recessed. Options include open canopy, dive brakes, slats, flaps and two different types of fuel probes. As per usual with Hasegawa, no weapons are included but a nice touch is the inclusion of a crew ladder.
Construction
Construction was pretty straightforward and fitting was generally OK. As it’s a modular mold, there are a lot of small parts that need to be added or cut off to get the exact variant you’re building. It’s also quite obvious that Hasegawa didn’t design the dive brakes to be closed as it took some sanding and finessing to get them to fit. The brakes also do not have the same ‘curve’ as the fuselage so when fitted in, they aren’t perfectly flushed.
TOPGUN 56 had some specific features in which Dave Aungst has wonderfully documented in his article on Hyperscale. I referred to it quite heavily for this build.
Colors and Markings
 The main colors used for this kit include:
|
|
The showcase of this build is of course the camouflage pattern which I have detailed here. It took a few rounds of tweaking and respraying but in the end, I think I got a decent result.
 The markings are on the TwoBobs Heinemann’s Hotrods but it turns out I only had the other options and not TOPGUN 56. I had to custom make my own decals so this was what I came up with. Since it’s my decal sheet, I decided to assign Lt. Pete Mitchell as the crew chief for TOPGUN 56. It didn’t come out perfect (the font is not 100% same, some of the sizes were off, BuNo in the wrong color and the nameplates aren’t in gold color) but it will have to do. Annoyingly, I placed the MARINES decals onto the tailfin before inserting the stabilizers. Turns out the starboard stab covers a bit of the marking. I cursed but had to move on. Otherwise though, the custom decals went on fine. The remaining ones came from the original TwoBobs sheet which worked very well although having to stack some of the decals was a bit challenging.
The edges of the MLG doors were painted with a red permanent marker. This is a whole lot easier than using a paintbrush.
 Finishing
After another gloss coat over the decals it was time to put everything together. The arresting hook, flaps, slats and refueling probe were attached with superglue and the 2 blade antennas with Gator glue. For some reason (and it seems like not many bring this up), the MLG doors are attached via a butt joint which isn’t ideal. To strengthen the joint I drilled a small hole in both the bay and the MLG door and inserted a 0.5mm brass tube to pin them together.
I then noticed that the brown camo on the port nose needed to be fixed: the demarcation between the brown and the grey was too low. I spent about 10 minutes cursing and 30 minutes deciding if I could live with the mistake. I decided that I couldn’t so I carefully masked off the decals with a Post-It note and rolled the blutack needed. Then I carefully sprayed on more paint to a somewhat finished kit (with all the fragile parts on). I made sure to spray in a very low pressure and in layers. I think I also held my breath on every color I added. Anyway, luckily for me it got done with no problems.
 Then I gave the whole kit a wash of black grey oil wash (yeah I’ve given up on the Vallejo Wash for now). My gloss coat wasn’t smooth enough so I had some difficulty removing the wash in some spots. In fact, my turpentine rubbed off a whole section of gloss from the upper fuselage. I’ll just say it’s patchy weathering on the plane. Interestingly the nose camo that I fixed also has a different tone even after the wash: yep… more ‘weathering’. I then attached the clear bits with Gator glue. These were colored with transparent Vallejo model color paints by hand.
Then an overall flat coat was sprayed on. After that I go back to brush Future onto the clear bits to gloss them back up. The exhaust is then cemented in place. The final step as per usual is removing the tape off the canopy which is always teeth gnashing. It wasn’t too bad though. Just a bit of scraping with a hobby knife after which I brushed on Future to clear up all the tiny scratches.
I made quite a few mistakes on this one:
- Had to replace the decals with custom made ones which aren’t really accurate
- I handpainted the landing gear so the paint is quite thick. I also did this when I wasn’t better at it
- Forgetting to buff down the paint before the first gloss coat (it’s something I’ve wanted to try)
- I should have attached the horizontal stabs before putting the decals on
- I need to deal with blutack better. Throughout this build I had trouble getting them to roll into a uniform thin roll for masking straight lines
- As this is a Queen from the shelf, it had quite a few parts that I missed out from the box. And I couldn’t find the box anymore so I had to break open another A-4 kit to get them
- I glued the intake inlets before commencing painting thinking it’ll make everything easier. Boy was I wrong. Next time they’ll be painted separately and attached after
- I’ve been having problems with the gloss coats in the last few projects. I have to address this
But most importantly, I’m done! Onward to the next imperfect build! 🙂
References
Modeling Madness – The story behind the MiG-17 on the A-4
Hyperscale – “Fake MiG” A Deceptively Painted A-4E
Number 6 of 2016


Quick question: what was the crew chief name on the two bobs sheet?
I have no idea. My sheet was a used copy so I did not have all of the TOPGUN 56 markings.